![Lopez amp front view [819x689, 146K]](pics/small/lopez-front.jpg)
![Lopez amp rear view [837x683, 139K]](pics/small/lopez-rear.jpg)
![Lopez amp control panel [1024x768, 141K]](pics/small/lopez-controls01.jpg)
![Lopez amp control panel close-up [1024x461, 59K]](pics/small/lopez-controls02.jpg)
![Lopez amp chassis and turret board [1021x538, 83K]](pics/small/lopez-chassis-board.jpg)
![Lopez amp inside view toward controls [998x523, 111K]](pics/small/lopez-inside01.jpg)
![Lopez amp inside view toward tube sockets [1024x482, 117K]](pics/small/lopez-inside04.jpg)
![Lopez amp preamp [1024x680, 136K]](pics/small/lopez-inside02.jpg)
![Lopez amp power supply, reverb driver, and output stage [1023x555, 117K]](pics/small/lopez-inside03.jpg)
This page describes a guitar amplifier that I finished building in September, 2005. The amp is named after Lopez Island in the state of Washington. Except for the mechanical work, I built the entire amplifier while on a 2-week vacation there. I finished the amp the day before the vacation ended, and it worked nicely the first time I powered it on. The build would have gone faster, but I had to take a lot of time out for bicycling, kayaking, eating good food, and drinking fine wines (and a few mediocre wines, too).
The amp uses a single-ended 6V6GT output stage that probably delivers around 5-6 watts of power. The preamp has a couple of 12AX7A triode stages and a 6SJ7 pentode stage for nice overdrive and compression. The amp also has a spring reverb driven by a 6K6GT power pentode and recovered by a 12AX7A triode stage.
I built the amp as a combo, using a Fender Tweed Super cabinet from Mojotone. It uses two Eminence 10-inch speakers: a Copperhead and a Ramrod. The amp has a rotary switch (not shown on the schematic) that enables me to play through both speakers together or either speaker individually.
I laid out and built a turret board for most of the electronics. I used a hammond 17" x 4" x 3" chassis. The circuit was a very tight fit in this chassis. I hope I'll never again have to try to wedge so much electronics into such a small space.
I wanted a crisp blues amp that could give me nice clean tones as well as a moderate amount of distortion, with good sustain. I'll probably continue to make small changes to this amp, but so far, I've been very pleased with the results. I think I might want to add a little more bass to the tone, but I'm not sure yet.
|
|
|
|
|
|
|
|
|
|
|
|
Click on any image to see a larger version of it, along with some text describing what you're seeing.
I'm still really a beginner on lead guitar, but I made a few short sound clips anyway to demonstrate the different sounds the amp can produce. I didn't use any effects or post-eq, so what you are hearing is just the amp and guitar. The guitar is a PRS McCarty, mostly on the neck pickup. I engaged the coil split on the final clip for more of a single-coil sound. On most (probably all) of these clips, I used both speakers (Eminence Copperhead and Ramrod). The microphone was a Shure SM57, positioned between the speakers an inch or two from the baffle. The recording studio was, uh, my living room.
These last two clips are pretty ugly, but I made them on a request from somebody who wanted to hear a couple of particular settings.
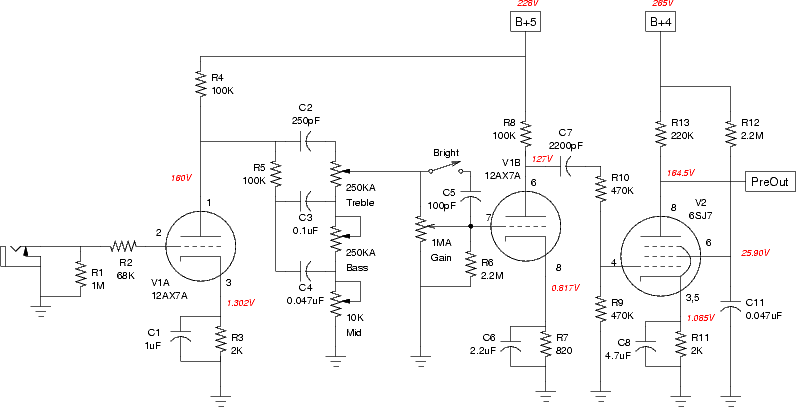
The preamp begins with a conventional 12AX7A input stage feeding a Fender-style tone stack and a gain control. A second triode stage follows. I placed the tone stack between the first two stages because I was not aiming for a lot of distortion in the second stage. The tone stack has enough loss to prevent the second stage from distorting too heavily, and it also provides EQ before any distortion has been introduced.
The signal is cut in half by R9 and R10 before driving a 6SJ7 pentode stage, which is intended to supply most of the compression and distortion. (I haven't had time yet to connect a scope and verify that.)
The output of the preamp feeds both the reverb circuit and the mixer/driver stage.
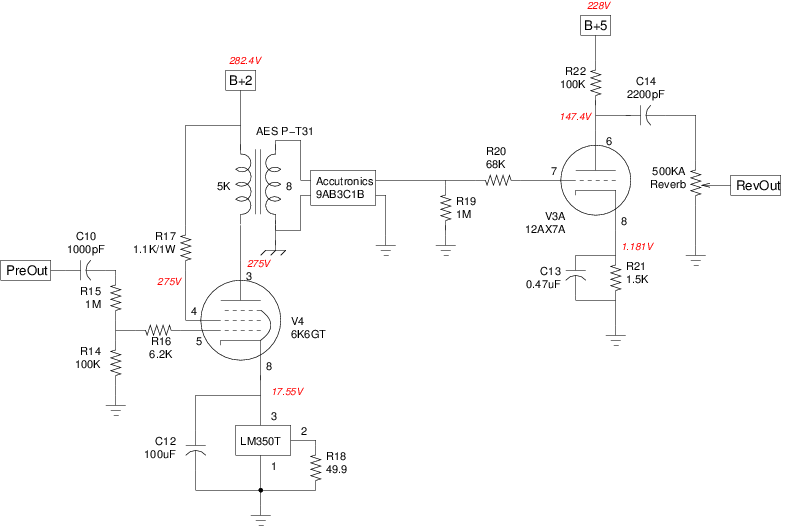
The reverb driver uses a 6K6GT power pentode, as did the venerable Fender 6G15 stand-alone reverb unit. Resistors R14 and R15 control how hard the reverb tank is driven. The values shown give me the sound I like, but they could be tweaked or replaced with a dwell control.
The reverb recovery circuit is a conventional single-stage triode amplifier. A reverb level control adjusts the amount of reverb that is mixed in with the dry signal.
The LM350T in the cathode circuit of V4 is an automatic biasing circuit that I devised. It is described in a separate section below.
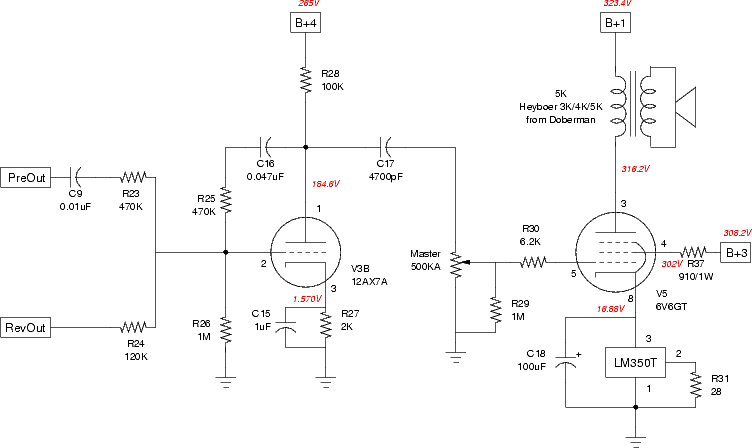
The dry signal and the reverb signal are fed into a mixer/driver stage formed by V3B. This stage is a bit unconventional. It is an inverting feedback amplifier as described on Randall Aiken's web site.
The inverting feedback amplifier has some great advantages. First, it isolates the two inputs very effectively, so there is practically no interference between them. Because of the negative feedback (via C16 and R25), the grid voltage stays very close to ground, preventing either input from propagating into the other.
Second, it is very easy to control the gain for each input of the mixer by adjusting the ratios of R23, R24, and R25. With the values I chose, the gain for the dry signal is about unity (R25/R23) while the gain for the reverb signal is about 3.9 (R25/R24). I initially had no idea how much gain I would need for each of these signals, and the inverting feedback amplifier made it easy to experiment and get the levels right.
Finally, the mixer/driver has a low output impedance (similar to a cathode follower) for driving the output stage. But the input impedance presented to the preamp is 470K, high enough to keep from loading the 6SJ7 stage excessively.
The output stage is a single-ended, cathode-biased power amplifier using a 6V6GT. It is conventional except for the automatic biasing circuit, which is described below.
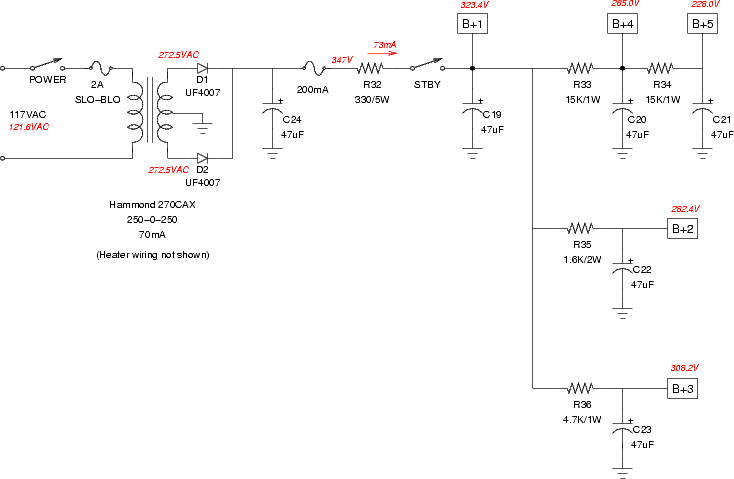
The power supply is fairly traditional. I used a lot of decoupling networks (probably more than necessary) to make sure there wouldn't be any coupling between the stages that might lead to oscillation problems. Many of the capacitors could probably be made smaller without introducing any problems. That would save a lot of space inside the chassis. I need to experiment with the fuses a bit more, but I suspect that they could be reduced to 1A on the primary and 100 mA on the secondary.
Both the output stage and the reverb driver use an automatic biasing circuit that I devised. I have no idea whether this has been done before by someone else. If it has, I've never seen it. [Update: I have since learned that this trick has been done before by a number of designers.]
The goal here was to make the amplifier adapt automatically and completely to variations in power tubes. I wanted to get exactly the bias current I had planned for, the first time and every time, without having to change any resistors or make any adjustments. I didn't want to have to readjust the bias every time I replaced a tube, and I didn't want the sound to suffer because the bias wasn't quite right for whatever tube I was using at the time.
Since the two bias circuits are similar, I'll discuss only the output stage. As you can see from the schematic, the usual cathode resistor is replaced by a LM350T voltage regulator and a single resistor (R31). The resistor can be low-wattage -- 1/4 watt is plenty. Thus, these two components may take up less room than the power resistor that would otherwise be needed.
The LM350T is wired as a constant-current source. The current is determined by the value of the resistor, and is given by this formula: Ik = 1.25 / R. This is the cathode current that will be supplied to the tube. The 28 ohm resistor used in the output stage gives a cathode current of about 45 mA.
What does it really mean to say the circuit is a constant-current source? It means that the circuit will automatically adjust the cathode voltage of the tube to whatever voltage is necessary to yield a cathode current of 45 mA. Suppose for a moment that the cathode current is too low. The circuit will reduce the cathode voltage, thereby reducing the bias and increasing the cathode current to the desired value. Likewise, if the cathode current is too high then the circuit will automatically increase the bias so the current drops back down to the correct level. The principle is similar to traditional cathode biasing. But a simple cathode resistor can provide only limited compensation for tube variations, while this circuit gives almost perfect compensation.
The bias circuit has no direct effect on the sound of the amp, since it is fully bypassed for AC signals by the cathode capacitor.
So far, I've been very pleased with the results of this circuit. I tried several different 6V6GT tubes from different manufacturers. The tubes ended up with quite different cathode voltages, but the current was correct in all cases.
Depending on the amp, this circuit may or may not be overkill. Regardless of that, it was a fun and successful experiment.